You filed your claim.
The adjuster came out.
And then — the dreaded letter: “We’ve determined that the damage is not covered under your policy.”
Sound familiar?
You’re not alone.
Thousands of valid storm damage claims are denied every year.
But the good news? A denial doesn’t mean the end of the road.
Here’s exactly what to do if your insurance company says “no” — and how to fight back the right way.
Step 1: Don’t Panic — and Don’t Take It Personally
First things first:
A denial is not final.
There are dozens of reasons claims get rejected:
- Adjuster missed the damage
- No roofer was present to point things out
- Damage wasn’t documented in the way insurance requires
- The wrong terminology was used
- It was deemed “maintenance” instead of “storm-related”
Most of these are fixable.
And none of them mean you’re out of options.
Step 2: Get a Second Opinion From a Qualified Roofing Contractor
If a roofer wasn’t on-site with the adjuster, that’s mistake #1.
Now it’s time to fix it.
Call a storm restoration roofing expert (not just a handyman). They will:
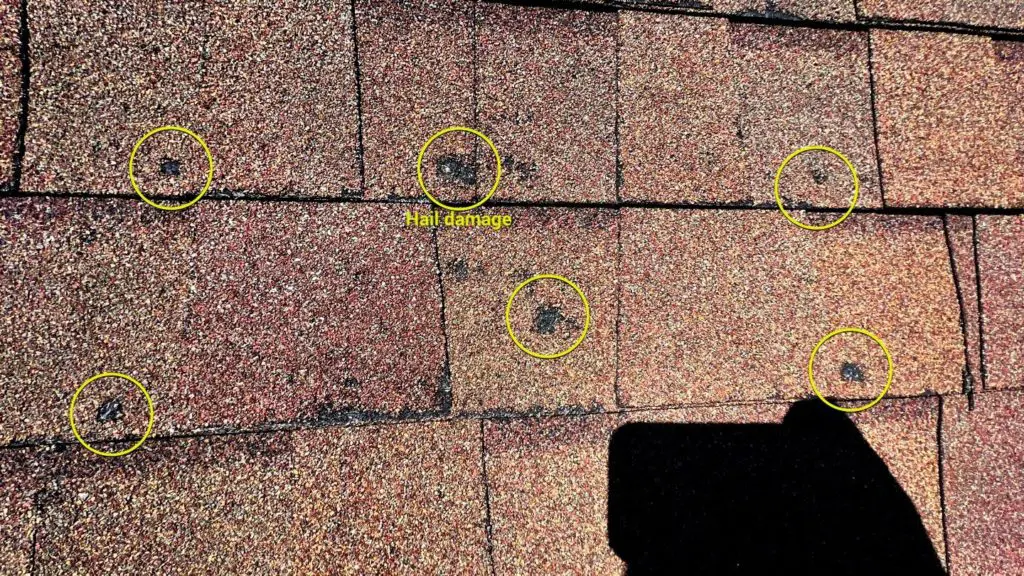
- Walk the roof and re-inspect everything
- Document damage with photos and chalk
- Review the insurance scope (if one was written)
- Identify what the adjuster missed or misclassified
Many homeowners are shocked to find that their roof actually has more damage than they were told — it just wasn’t documented properly.
Step 3: Request a Re-Inspection — It’s Your Right
You are legally allowed to request a second adjuster or a re-inspection.
This time, make sure your contractor is present — boots on the roof, side-by-side with the adjuster.
Pro tip:
Most insurance companies won’t volunteer this option… but they must honor it if you request it.
❗ Be respectful, but firm. Say:
“I’ve had a licensed contractor inspect the damage, and I’d like to request a re-inspection with them present.”
Step 4: Understand the Real Reason for the Denial
Ask for the denial in writing. Look for language like:
- “No storm-related damage found”
- “Pre-existing or maintenance-related”
- “Below deductible threshold”
Then hand that over to your roofer. A solid restoration contractor knows how to build a counter-narrative with evidence — photo reports, local storm data, and itemized supplements.
This turns your denial into a documented rebuttal — and often, a reversal.
Step 5: Supplement, Appeal, or Escalate
There are 3 routes you can take after a denial:
1. File a Supplement
Your contractor can submit additional documentation, photos, and line-item estimates that challenge the original scope.
2. File an Appeal
You can request a formal review — especially when you believe your roof was misdiagnosed or improperly inspected.
3. Escalate
If all else fails, consider involving a public adjuster or consumer advocate. Many work on contingency and only get paid if your payout increases.
Step 6: Document Everything (Yes, Again)
You’ve heard this before, but it’s worth repeating:
- Save all denial letters, emails, and policy documents
- Record phone calls or log the time, date, and rep name
- Keep receipts for temporary repairs or tarping
- Take before and after photos if damage worsens
Your paper trail is your leverage. Use it.

Final Word: Denial Isn’t the End — It’s the Start of Round Two
Just because your claim was denied doesn’t mean your roof is fine.
And it doesn’t mean you’re out of options.
With the right roofer, proper documentation, and a clear strategy — you can challenge the denial and get your home taken care of.
Call Alfa Y Omega Construction today for a free second opinion and claim support.
We’ve helped dozens of homeowners turn denials into full replacements — and we’ll do the same for you.
Don’t settle for “no.” Let’s get what you deserve.

Slade is the Sales Manager at Alfa Y Omega Construction and brings over 24 years of hands-on experience in the construction industry. He’s passionate about helping homeowners navigate the often confusing process of roof replacement and storm-related insurance claims. With a background rooted in both fieldwork and customer service, Slade ensures every client is informed, protected, and treated with integrity. Whether it’s identifying hidden damage or guiding you through a complex claim, his goal is to simplify the process and deliver results. When you work with Alfa Y Omega, you get a team that fights for your home like it’s their own.